Testing an Ecommerce Web Component using Jest

Unit testing plays a crucial role in ensuring the reliability and correctness of individual components. In this post, we will delve deeper into the unit testing of the CartItem component, focusing on the structure of the tests and the AAA (Arrange, Act, Assert) testing framework.
This is the second blog post in a trilogy related to vanilla JavaScript Web Components:
- Creating an Ecommerce Web Component from scratch.
- Testing an Ecommerce Web Component using Jest.
- Testing an Ecommerce Web Component using Cypress.
The AAA Testing Framework
The AAA testing framework, consisting of Arrange, Act, and Assert phases, provides a structured approach to writing unit tests.
- Arrange: In this phase, the test setup is performed, including creating necessary objects, setting up initial conditions, and preparing the environment for the test.
- Act: The Act phase involves executing the specific functionality or behavior that is being tested. This is where the action that triggers the behavior under test is performed.
- Assert: The Assert phase verifies the outcome of the action taken in the Act phase. It checks whether the expected results match the actual results, ensuring that the component behaves as intended.
Detailed Test Cases
Step 1: Testing Environment Setup
Since we are working with a Vanilla JavaScript project, we need to perform some basic setup for our testing environment using Jest:
- Initialize a new Node.js environment by running
npm init - Install the
jest,@types/jest,jest-environment-jsdom,@babel/core, and@babel/preset-envas dev dependencies. - Create a new
jest.config.jsfile in the project’s root directory and add the following configuration:module.exports = { clearMocks: true, testPathIgnorePatterns: [ "/node_modules/", ], testEnvironment: "jsdom" }; - Create a new
babel.config.jsfile in the project’s root directory and add the following configuration:module.exports = { presets: [ [ '@babel/preset-env', ], ], } - Add the following scripts in the
package.jsonfile:"scripts": { "test": "jest", "test:watch": "jest --watch", "test:verbose": "jest --verbose" }
Step 2: Test Suite General Setup
Each test begins with creating a new instance of the CartItem component and appending it to the document body. After the test, any mocks are reset, and the component is removed to ensure a clean state for subsequent tests:
describe('CartItem', () => {
  let cartItem, name, image, alt, quantity, price;

  beforeEach(() => {
    // Arrange
    name = 'Test Item';
    image = 'test.jpg';
    alt = 'Test Image';
    quantity = 1;
    price = 100;

    // Act
    cartItem = new CartItem({ name, image, alt, quantity, price });
    document.body.appendChild(cartItem);
  });

  afterEach(() => {
    jest.resetAllMocks();
    document.body.removeChild(cartItem);
  })
)
Step 3: Testing Property Initialization
The first test verifies that the component correctly initializes its properties from the constructor arguments:
test('should create \'CartItem\' element with correct properties', () => {
  // Assert
  expect(cartItem.name).toBe(name);
  expect(cartItem.image).toBe(image);
  expect(cartItem.alt).toBe(alt);
  expect(cartItem.quantity).toBe(quantity);
  expect(cartItem.price).toBe(price);
})
Step 4: Testing HTML Structure
Snapshot testing is used to ensure the rendered HTML matches the expected structure. This test confirms that the component’s render method produces the correct output.
The execution of Snapshot testing creates a __snapshots__ folder, and inside it, a new .snap file with the HTML structure to be observed.
For more details on Snapshot Testing, please visit the official Jest documentation: click here
test('should render the correct HTML', () => {
  // Assert
  expect(cartItem.innerHTML).toMatchSnapshot();
})
Step 5: Testing Interaction
Further tests simulate user interactions, such as clicking the increase and decrease buttons, and verify the component’s response, including updates to the quantity and subtotal:
test('should increase the quantity when the increase button is clicked', () => {
  // Act
  const increaseButton = cartItem.querySelector('.increase');
  increaseButton.click();

  // Assert
  expect(cartItem.getState('quantity')).toBe(2);
  expect(cartItem.getState('subTotal')).toBe(200);
})

test('should decrease the quantity when the decrease button is clicked', () => {
  // Act
  const decreaseButton = cartItem.querySelector('.decrease');
  decreaseButton.click();

  // Assert
  expect(cartItem.getState('quantity')).toBe(0);
  expect(cartItem.getState('subTotal')).toBe(0);
})
Step 6: Testing Custom Events Dispatching
These tests verify that the expected custom events are dispatched with the correct event types and details, ensuring proper communication within the application. We demonstrate two ways for simulating the events in the testing environment:
-
In the first test, we attach the event listener to the document to avoid mocking the
dispatchEvent. -
In the second test, we spy on the
dispatchEventfunction.
For more details on mocks and spies, visit this great article from our friends at javascript.plainenglish.io: click here
test('should dispatch a custom event when \'remove\' button is clicked', () => {
  // Arrange
  const removeButton = cartItem.querySelector('.remove');
  // Simulate the dispatchedEvent by attaching a listener to the document.
  // This way there's no need to mock the 'dispatchEvent'
  let dispatchedEvent = null;
  document.addEventListener('remove-from-cart', (event) => {
    dispatchedEvent = event
  })

  // Act
  removeButton.click();

  // Assert
  expect(dispatchedEvent).not.toBeNull();
  expect(dispatchedEvent.type).toBe('remove-from-cart');
  expect(dispatchedEvent.detail.name).toBe(name);
})

test('should dispatch \'decrease-quantity\' event when \'Decrease\' button is clicked', () => {
  // Arrange
  const decreaseButton = cartItem.querySelector('.decrease');
  // Spy on the 'dispatchEvent' function
  const decreaseQuantityEventSpy = jest.spyOn(document, 'dispatchEvent');

  // Act
  decreaseButton.click();

  // Assert
  expect(decreaseQuantityEventSpy).toHaveBeenCalledWith(expect.objectContaining({ type: 'decrease-quantity' }));
  expect(decreaseQuantityEventSpy).toHaveBeenCalledWith(expect.objectContaining({
    detail: {
      name,
      quantity,
      price
    }
  }));
})

test('should dispatch \'increase-quantity\' event when \'Decrease\' button is clicked', () => {
  // Arrange
  const increaseButton = cartItem.querySelector('.increase');
  const increaseQuantityEventSpy = jest.spyOn(document, 'dispatchEvent');

  // Act
  increaseButton.click();

  // Assert
  expect(increaseQuantityEventSpy).toHaveBeenCalledWith(expect.objectContaining({
    type: 'increase-quantity',
    detail: {
      name,
      quantity,
      price
    }
  }));
})
Step 7: Testing UI Rendering
UI rendering testing is utilized to verify whether a CSS class is present or not, based on the remove button click and product quantity:
test('should show button when quantity is greater than zero', () => {
  // Arrange
  const removeButton = cartItem.querySelector('.remove');

  // Assert
  expect(removeButton.classList).toContain('hidden')
})

test('should hide remove button when quantity is equal to zero', () => {
  // Arrange & Act
  const decreaseButton = cartItem.querySelector('.decrease');
  decreaseButton.click();

  // Assert
  expect(cartItem.querySelector('.remove').classList).not.toContain('hidden');
})
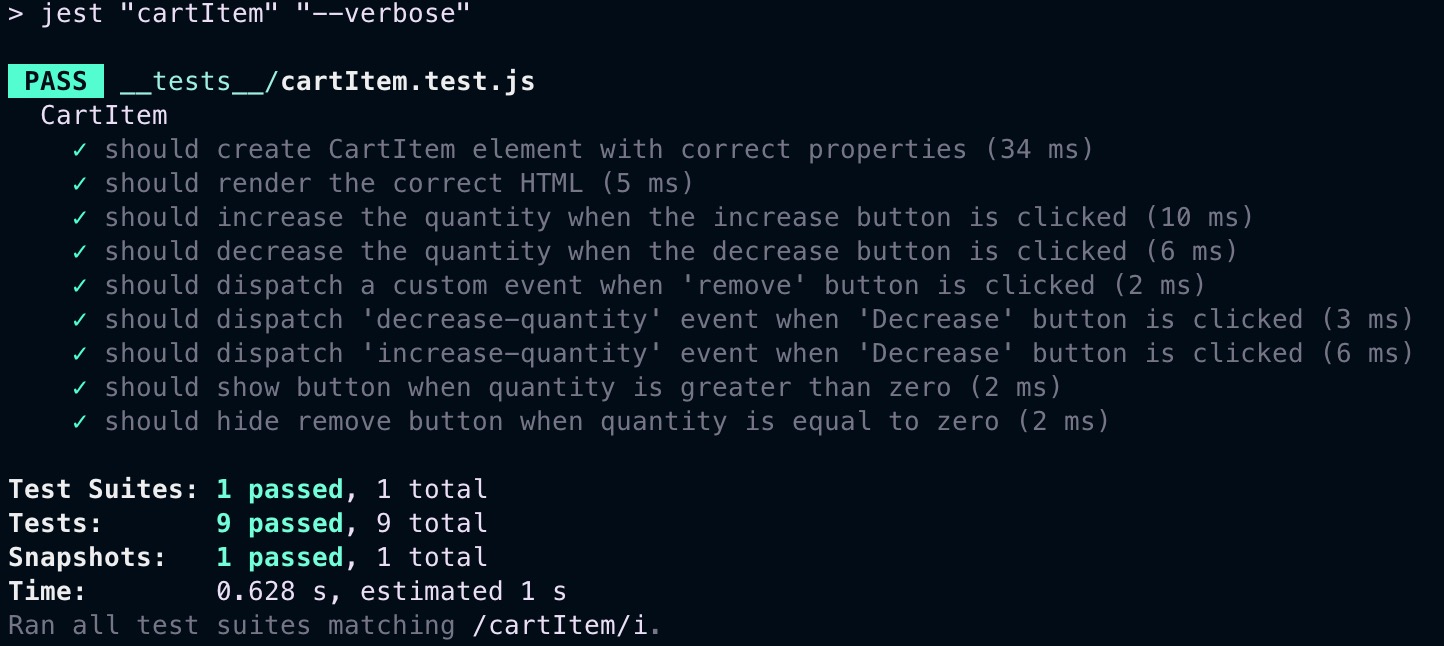
That’s it!. We now have a complete test suite for our CartItem Web Component. The results can be seen running the npm run test:verbose cartItem command in the terminal:

Conclusion
These tests collectively ensure that the CartItem component behaves as expected, providing confidence in its reliability as part of the larger application.